> ## Documentation Index
> Fetch the complete documentation index at: https://dacruzdev.mintlify.site/llms.txt
> Use this file to discover all available pages before exploring further.
# Render Cryptomatte and AOV Passes in ScreenshotKit
> Generate spec-compliant Cryptomatte EXRs and AOV passes: object IDs, lighting components, depth, normals, motion vectors, and more, for compositing.
Use this when you are compositing in Nuke, Fusion, After Effects, or Resolve and you want geometry IDs, lighting components, depth, normals, or motion vectors as separate channels.
 ## Steps
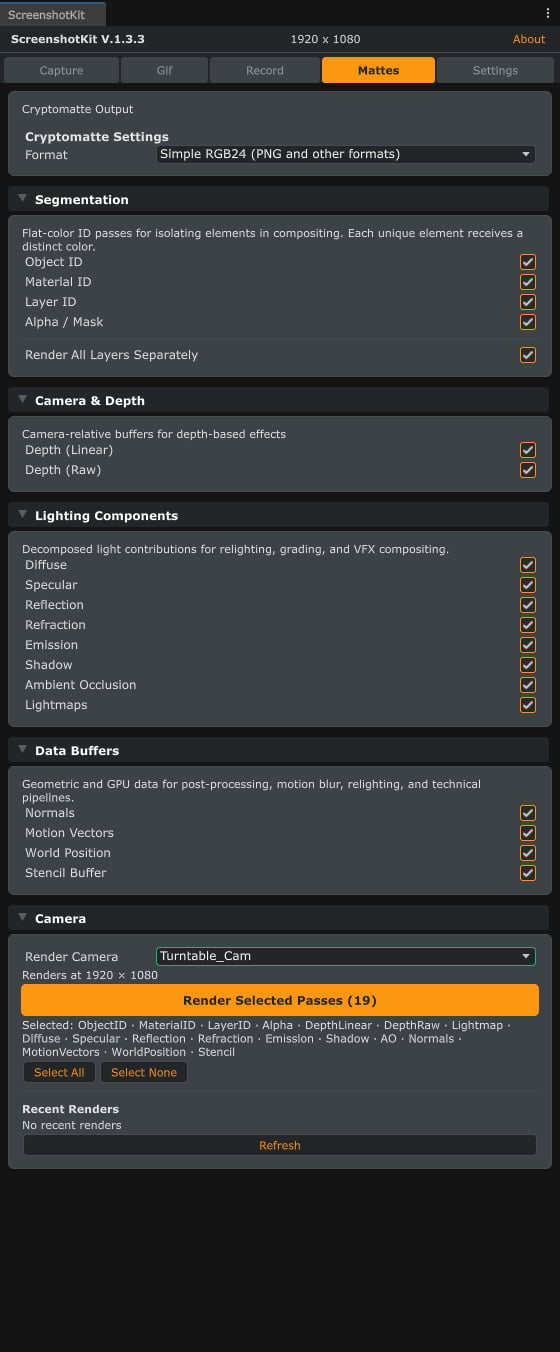
In the ScreenshotKit window, click the **Mattes** tab.
| Mode | What it writes | When to pick it |
| ---------------------------------------- | ---------------------------------------------------------------------------------------------------------- | -------------------------------- |
| **Multi-layer EXR (Cryptomatte 1.2.0)** | Spec-compliant Cryptomatte EXR with MurmurHash3 IDs and manifest, loadable directly in Nuke / Fusion / AE. | Production compositing. Default. |
| **Simple RGB24 (PNG and other formats)** | Hue-rotated PNG thumbnails, readable as preview images but not real Cryptomatte. | Quick reference thumbnails only. |
* **By GameObject**: every unique GameObject gets its own ID.
* **By Material**: every unique material is one ID.
* **By Layer ID**: IDs come from Unity's layer bitmask.
Enable the passes you want from the four groups:
* **Segmentation**: Object ID, Material ID, Layer ID, Alpha
* **Camera & Depth**: Depth (Linear), Depth (Raw), Lightmap
* **Lighting Components**: Diffuse, Specular, Reflection, Refraction, Emission, Shadow, Ambient Occlusion
* **Data Buffers**: Normals, Motion Vectors, World Position, Stencil
Either click **Render Selected Passes** to render only the matte passes, or go back to the **Capture** tab, enable **Render Mattes** under **Settings**, and take a normal screenshot. Every enabled pass is rendered alongside the beauty pass.
## Result
One file per enabled pass, named with the pass suffix (for example `MyCam_ObjectID.exr`, `MyCam_Normals.png`). Multi-layer EXR mode forces `.exr` for ID passes regardless of the global image format setting.
AOV passes need **URP** for full fidelity. On the Built-in render pipeline, lighting and data-buffer passes fall back to a standard Diffuse render, so you will get a lit image where you expected normals. HDRP is detected and reported but not actively supported for AOV passes.
For compositing, **Multi-layer EXR** is what you want. **Simple RGB24** exists only because the hue-rotated PNGs are readable as thumbnails.
Depth (Linear) is normalised 0 to 1 across the camera's near and far planes. Depth (Raw) is the unprocessed Z-buffer.
## See also
* [AOV Pass List](/reference/aov-pass-list) for what each of the 18 passes captures.
* [Runtime API: capture with mattes](/api/capture-with-mattes) for the scripted equivalent.
## Steps
In the ScreenshotKit window, click the **Mattes** tab.
| Mode | What it writes | When to pick it |
| ---------------------------------------- | ---------------------------------------------------------------------------------------------------------- | -------------------------------- |
| **Multi-layer EXR (Cryptomatte 1.2.0)** | Spec-compliant Cryptomatte EXR with MurmurHash3 IDs and manifest, loadable directly in Nuke / Fusion / AE. | Production compositing. Default. |
| **Simple RGB24 (PNG and other formats)** | Hue-rotated PNG thumbnails, readable as preview images but not real Cryptomatte. | Quick reference thumbnails only. |
* **By GameObject**: every unique GameObject gets its own ID.
* **By Material**: every unique material is one ID.
* **By Layer ID**: IDs come from Unity's layer bitmask.
Enable the passes you want from the four groups:
* **Segmentation**: Object ID, Material ID, Layer ID, Alpha
* **Camera & Depth**: Depth (Linear), Depth (Raw), Lightmap
* **Lighting Components**: Diffuse, Specular, Reflection, Refraction, Emission, Shadow, Ambient Occlusion
* **Data Buffers**: Normals, Motion Vectors, World Position, Stencil
Either click **Render Selected Passes** to render only the matte passes, or go back to the **Capture** tab, enable **Render Mattes** under **Settings**, and take a normal screenshot. Every enabled pass is rendered alongside the beauty pass.
## Result
One file per enabled pass, named with the pass suffix (for example `MyCam_ObjectID.exr`, `MyCam_Normals.png`). Multi-layer EXR mode forces `.exr` for ID passes regardless of the global image format setting.
AOV passes need **URP** for full fidelity. On the Built-in render pipeline, lighting and data-buffer passes fall back to a standard Diffuse render, so you will get a lit image where you expected normals. HDRP is detected and reported but not actively supported for AOV passes.
For compositing, **Multi-layer EXR** is what you want. **Simple RGB24** exists only because the hue-rotated PNGs are readable as thumbnails.
Depth (Linear) is normalised 0 to 1 across the camera's near and far planes. Depth (Raw) is the unprocessed Z-buffer.
## See also
* [AOV Pass List](/reference/aov-pass-list) for what each of the 18 passes captures.
* [Runtime API: capture with mattes](/api/capture-with-mattes) for the scripted equivalent.